

Ready to earn rFLR rewards during the Flare Fair? This guide shows you how to get started using Sceptre and sFLR.
Step 1: Connect to Flare via Stargate
In their own words, Stargate is a “fully composable liquidity transport protocol” and serves as the gateway to the Flare Fair. Before we get started, you must ensure your wallet is configured for the Flare Network. It’s pretty quick and easy to do - just click here, select your wallet and follow the instructions. When you’re ready, head over to Stargate and select Transfer from the app’s menu. Participation in the Flare Fair requires bridging USDC, USDT, or ETH. New users without FLR in their wallet will receive a small amount to get started.
So, on the Transfer tab, select the Network you’re bridging from and the token, then select Flare as the destination network and the respective token you want to receive.
On the "Transfer" tab, choose the source network and the token you're bridging. Then, select Flare as the destination network and the corresponding token you wish to receive. In the case below, out of all the supported tokens I only have ETH in my wallet so that’s what I’ll be bridging and converting to WETH on Flare. Enter the amount you want to bridge, select the transfer speed (fast transfers are more expensive) and click Transfer.

You'll be prompted to confirm the transaction in your wallet. Once confirmed, your wallet will contain the corresponding asset compatible with the Flare Network.
Step 2: Convert your assets to FLR or wFLR
After completing the first step, you're ready to use your assets in the Flare Fair to earn rewards. To do so, go to the Fun Zones and explore the many protocols available and the opportunities for your assets. Sceptre is among them, but we only accept FLR or wFLR so you must first convert your WETH, USDC or USDT into FLR or wFLR. You can do so at one of 3 DEXes available:
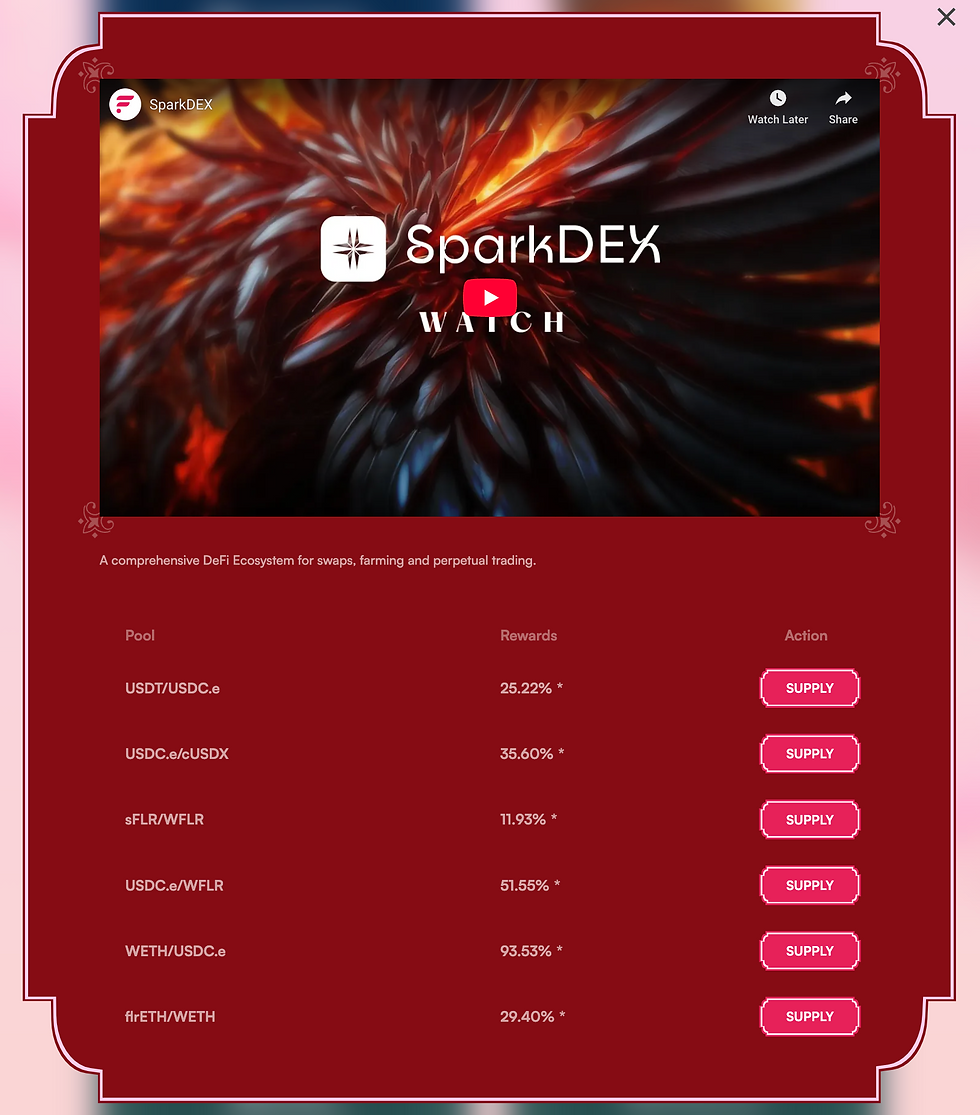
SparkDEX - Connect to SparkDEX and go to the Swap tab to exchange your tokens for either FLR or wFLR. SparkDEX supports WETH, USDC and USDT so you’ll be covered regardless of the token you picked at the start of this journey.
Enosys - Enosys works the same way as SparkDEX: simply connect your wallet, go to Swap and select the token you want to swap for either FLR or wFLR
BlazeSwap - The process on BlazeSwap is just as simple: connect your wallet to the protocol, and go to the Swap tab. Unlike SparkDEX and Enosys, BlazeSwap only supports bridged USDC and USDT so if you’ve bridged ETH you will have to go somewhere else.

Because decentralized exchanges (DEXs) operate independently, they often offer varying exchange rates for the same tokens. It's recommended to compare the rates on each DEX to maximize the value of your swap.
Step 3: Stake on Sceptre to receive sFLR
With FLR or wFLR in hand, you're ready to stake and start earning! A 47.51% APY, at the moment of writing, sounds appealing, right? For those unfamiliar, Sceptre allows you to participate in a staking pool by depositing FLR or wFLR. In return, you'll receive rewards and FlareDrops, which are automatically re-staked, compounding your interest and maximizing your yield. You'll also receive a liquid staking token, which can be used in various ways across multiple protocols on the Flare Network.

After confirming your agreement, click "Stake." Be aware of Sceptre's staking periods: a 23-day "buy-in" period with a 4.4% fee, and a subsequent 7-day "no-fee" period. Staking during the buy-in period incurs the fee. Learn more about the fee structure here. Upon staking, you'll receive sFLR in your wallet, corresponding to the current exchange rate. Like we mentioned before, this sFLR can be used across multiple protocols within the Flare Fair to earn additional rewards on top of your Sceptre staking rewards.
Step 4: Explore sFLR opportunities on the Flare Fair
Now, let's maximize your yield with sFLR! While your FLR or wFLR earns rewards and FlareDrops on Sceptre, your sFLR can generate additional returns elsewhere. Explore the "Fun Zone" for sFLR opportunities.
These opportunities vary, and we strongly encourage you to conduct your own research before deploying your sFLR. The tutorials on our blog offer valuable information on liquid staking and how to use some of the featured protocols.
We will cover all of the sFLR opportunities available on the Flare Fair in an upcoming blog post. Until then, make sure to follow us on X, and to follow Flare as well to stay on top of new reward opportunities.
Comments